Some months ago I bought a non-working Mercer chronometer on a local auction site, but was unable to collect it because of Covid 19 lock-down. The seller was unwilling to post it, even at my own risk and with careful packing instructions. He had fairly guessed that the upper balance pivot was broken.
Thanks to a visiting friend, the chronometer eventually arrived in its original carrying case and with its original Mercer certificate of goodness. Its mean daily rate at 21 Celsius over three days of December, 1973 was given as 0.3 seconds, losing. It had also been tested at 4 and 35 degrees, with differences of daily rate between any two temperatures not to exceed 1.5 seconds. If allowed to run for 48 hours without winding, its daily rate was not to exceed 2 seconds.
Cases
Figure 1 shows the outer case as received and the inner case after restoration. The outer case is of 10 mm mahogany-faced plywood with rebated corner joints and lined with green baize-covered padding. The inner case is of solid mahogany with a traditional design, though without a lid or handles. Both had been coated with a thick layer of dark brown varnish that took a good deal of effort to remove. Hinges and catches are of chromed steel.

Gimbals
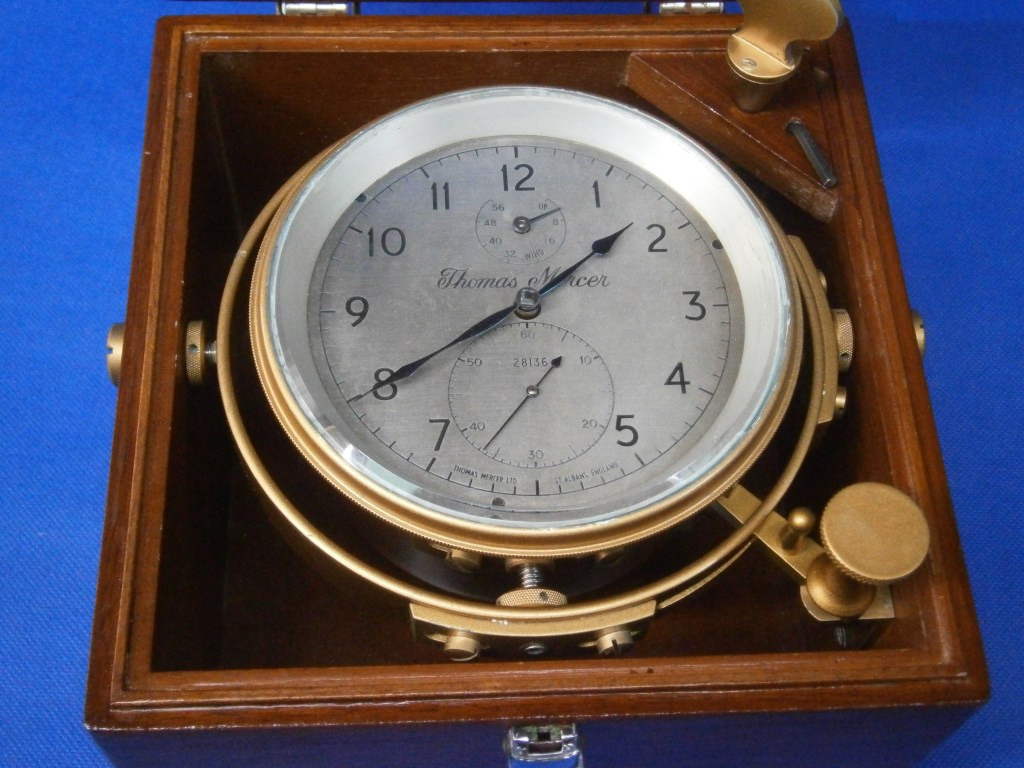
Figure 2 shows the view upon opening the inner case. The face and bowl are of normal design, the numerals are Arabic and the hands differ little from those of a hundred years previously. The supports of the bowl and gimbals in the case are a little unusual and are shown in Figure 3.

Instead of a dome or cheese head screw, an Allen screw is used, locked to the ring by a capstan nut with diamond knurling. The reduced tip of the screw enters a boss in the bowl bracket. The ring itself is usually supported in the case by screws through the wood of the case, locked by a large and thin finger nut with straight knurling. A chronometer in its bowl weighs about 2 kilograms (4.4 lbs) and if carelessly “handled” by a postal service, may well tear out of the wooden sides of the cases.
Figure 4 shows how Mercer has moved on from tradition and has adopted an engineering approach by screwing large diameter threaded bushes through the side walls for the Allen screws that secure the gimbals ring. However, unless it is being transported by hand, it is always wise to remove the chronometer in its gimbals and sit it on resilient padding on the bottom of the case, surrounded by more padding and with more on top. It is also a sound plan to add some stout card or thin plywood on top of this padding inside, to protect the glass of the lid from any movement of the chronometer.

Face
As might be expected of an instrument that showed no signs of ever having been overhauled, it face looked a bit shabby, but this was easily improved by cleaning, lightly abrading down to the brass with 1200 grit emery paper and re-silvering using a proprietary preparation. None of the engraving needed to be refilled.


Movement
Over many years, oil and grease in the chronometer mechanism gradually evaporates from where it has been placed and diffuses throughout the mechanism and bowl interior to condense and leave a thin oily film (this also happens with binoculars). Figure 6 shows the generally dingy condition of the top plate and upper balance cock. The spring barrel has been protected in part by the barrel plate and shows some of the original finish. The underside of the plate showed similar areas where the spring barrel and fusee had protected the plate finish.

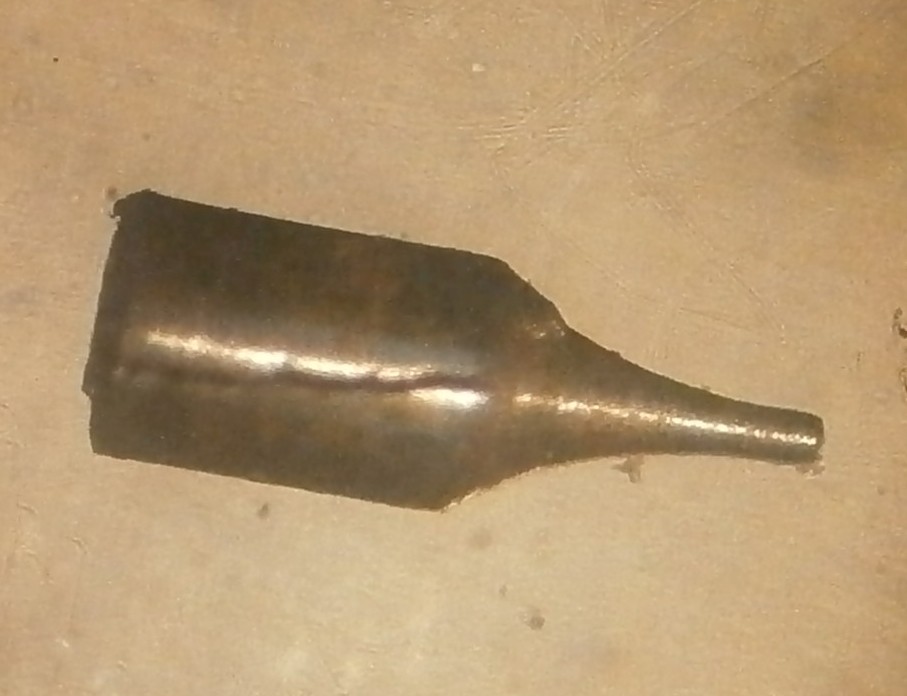
The seller had correctly suggested that one of the balance pivots was broken, and after fully stripping down and cleaning the chronometer I replaced the broken upper pivot with a muff (see Post number 7, part 2, 27 July 2013). This of course also involved removing the balance wheel, its hub and the two rollers. The procedure led to a series of misfortunes, beginning with making the muff too tight a fit on the turned down balance staff. With a wall thickness of only 0.1 mm, a crack developed unnoticed in the muff and under load it propagated with the result shown in Figure 7.
A disaster to the detent
.When I came to regulate the chronometer, I found that it varied so widely that I knew something was amiss and I first looked at the balance staff. In this blog and in my book “The Mariner’s Chronometer” I have repeatedly emphasised that one should always block the third wheel before removing the balance or detent. On this occasion, after several tries of a new muff for length, I forgot. I then inadvertently knocked the locking stone off an escape wheel tooth and the chronometer “ran away.” I got a finger on the third wheel, but not before the locking stone (or “jewel”) was badly chipped, the detent spring buckled and an escape wheel pivot was broken.
Mercers of St Albans still exists, though they no longer make chronometers. I hoped that they might nevertheless have kept spare jewels, but I was out of luck and so had to make my own replacement. Figure 8 shows the undamaged detent.
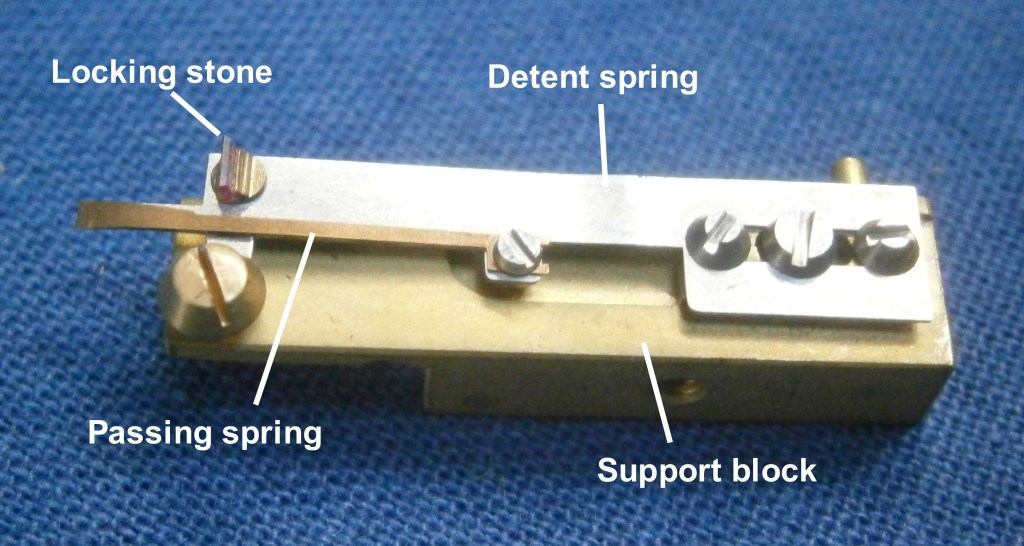
The usual form of detent has a narrow ruby locking stone of about 0.8 mm x 3 mm that projects above the line of the detent spring. As well as being delicate, it also imparts a twisting force to the spring. From about 1946, Mercer arranged for the stone to be a chip of ruby of low profile, held inclined towards the tip of the detent in a brass holder. Both the stone and the horn of the detent are aligned with the detent spring. The detent itself was a stamped-out strip of white metal about 0.3 mm thick with the detent spring ground down to about 0.08 mm thick. This was then attached to a narrow strip of brass by two screws, the whole sliding in a groove machined in the support block. Figure 9 may make this clearer. Note how the holder for the locking stone and a brass bush for the screw that holds the passing spring are swaged on the underside of the detent.

Usually, one of the first things I do upon removing a balance for the first time is to take a photo of the impulse and unlocking rollers for reference, so that I can replace them in approximately the same orientation when re-assembling. Somewhat unusually in this instance is that the impulse stone is not radial, while the unlocking stone is as usual (Figure 10). The angle between them, at least through their tips, appears to be about 90 degrees, rather than the more usual 80 degrees or so.

When replacing escapement pivots it is important that there should be the very minimum of end play, consistent with free rotation, as not much more than the end 0.1 mm of a pivot is actually engaged in the hole stone. If a pivot is missing, then the original length of an arbor is unknown. I usually turn down the arbor for a little longer than needed and make the hole in the muff a little deeper too, so that the overall length can be adjusted by using a small soldering iron to soften the shellac that holds the muff in place,. Nevertheless, I had to make several muffs of slightly different lengths before finding one that would allow a perfect fit. A balance staff or escape wheel arbor that is just a little too short may lead to occasional and mysterious tripping, in which the instrument suddenly gains half a second. No amount of varying the angle between unlocking and impulse stones fixes the problem.
The detent I suspect is made of nickel silver, a bronze in which about half the zinc has been replaced by nickel, as it was relatively easy to straighten the buckling by drawing it between the tips of a pair of tweezers until it appeared perfectly straight. The locking stone was another matter, as it had slipped from my tweezers, to be swallowed up by some ruby-hungry entity lurking at the back of my bench. After remarking to myself that this was very unfortunate and failing after a lengthy search and tidy-up to find it, I had to make a new one from tungsten carbide Figure 11.

The stone is a mere 0.3 mm thick and 1.6 mm square so for someone like me, unused to handling such tiny pieces of mechanism, it took some experimentation to work out how to cut it. I began by cutting a slice off an old tungsten carbide tool insert with a small diamond rotary saw and then grinding it to the desired thickness using a diamond wheel on a tool and cutter grinder. Of course, I had first to attach it with flake shellac to a scrap piece of ground flat stock, so that it could be held on a magnetic chuck. From the sliver of material thus produced I could then try to cut off pieces of the desired length and width using the diamond saw. After several attempts I eventually succeeded in getting a square piece of about the correct dimensions, which I then reduced to size with diamond files, holding it in a small antique hand vice to file the back relief.
I finished by lapping the working face to a polished finish, first on a diamond lap and then with progressively finer grades of diamond coated film, ending with the pink 1 micron grit shown in Figure 11. Tungsten carbide has a hardness of about 9.5 on the Mohs scale and on an absolute scale is somewhat harder than ruby, so I do not expect it to wear out.
I have a stereo-microscope mounted on an arm above my work bench and certainly needed it to cement the new stone in its holder using flake shellac. It leans forward about 12 degrees, and getting it to sit at this angle while still sitting squarely in its holder took many anxious minutes of softening the shellac with a soldering iron, readjusting, checking the angle from the side, and checking for squareness from the front before I was satisfied. In intervals, as I worked out how to hold and shape such a tiny piece, easily mistaken for a piece of dust, I cleaned the plates and every other part, removed old grease from the mainspring and stop work, checked every link of the chain for stiffness, cleaned out pivot holes and jewels, inspected pivots for wear, resilvered the dial and applied oil and grease as necessary to moving parts.
Adjusting the escapement
The problem with this is that adjusting one part of the escapement results in a change to another part. It is as well to start by checking that the rollers and lower balance spring stud are in the same angular relationship as before starting the overhaul, in the hope that no previous unsuccessful attempt has wildly upset the relationship. I reiterate that the third wheel should always be blocked while each adjustment is made.
The chronometer is then put into beat so that the unlocking stone at rest lies just to one side of the passing spring, neither lifting it on the ‘free swing” direction nor tending to lift the locking stone off an escape wheel tooth in the other. This can be done preferably by turning the lower balance spring stud on the balance staff, since rotating the unlocking roller then upsets its angular relationship with the impulse roller.
At this point, the mainspring can be set up half a turn so that a tooth is locked and the locking stone depth into the tooth can be adjusted and both the draw and the locking checked. Too much depth slows down the unlocking so the impulse stone runs ahead of the tooth that is supposed to be providing the impulse, as well as perhaps missing locking on the next tooth. Too little depth also risks failure of locking or even tripping or running away (hence the mere half turn on the mainspring). Changing the depth by cautious adjustment of the banking screw of course changes the beat, which then has to be re-adjusted.
The depth of the detent into the unlocking stone also has to be adjusted. Too little combined with worn balance pivots or damaged hole jewel may lead to tripping or total failure of unlocking. Too much will give insufficient gap between the moment of unlocking and the arrival of the impulse stone, so that impulse is too feeble or missed altogether.
Supposing the happy state has been reached so that the balance can be set into motion, with a finger poised to stop the third wheel if necessary, if the motion of the balance accelerates, all well and good. Attention can then be paid to get a lively range of motion by making minute adjustments to one or other of the rollers. The impulse roller is usually set quite hard on its taper and is difficult to turn, so that a slip of the pliers may lead to the demise of the impulse stone. Normally, the unlocking roller is a friction fit on the balance staff and has a flat on it so that it can be rotated by a suitable home-made wrench.
After making an adjustment and restarting the movement, it may take several minutes for the balance to reach its maximum excursion of about one and a quarter turns, so enough time should be allowed for this to happen before judging whether an adjustment has led to a reduction in the motion that needs further adjustment in the opposite direction. It can be difficult to judge what the range of motion is and modern cameras and cell phones that make a slow motion video record are a great help. Eventually, a tiny adjustment of the unlocking roller converted a sluggish movement to a vigorous one. After adjustment of the timing nuts the three day rate at 20 degrees Celsius is 1.2 seconds losing. Figure 12 shows the final result after cleaning.

I am always happy to receive advice and constructive criticism from those who are better informed or with more experience than I have.

Leave a comment