When chronometers get dropped sometimes it is not only the pivots that suffer. The jewels, often known as “stones,” sometimes get chipped or cracked. Continuing to run a chronometer with a cracked stone is to invite the pivot to develop grooves and eventually the pivot gives way. A half-dead pivot can be seen at Figure 2 of post number 5 of April 2013. When a stone is chipped and the hole in it becomes irregular, often the chronometer will not run at all, or if it does, may have an irregular rate, or only run one way up. Unfortunately, replacement hole stones in chronometer size are hard to come by for the occasional repairer, though occasionally mounted stones turn up for Soviet chronometers on e-bay – at a price.
Early chronometers had few jewels, but ran well with the pivots running in the brass of the plates, or in bushes let into the plates. A few days ago, I became impatient waiting for a replacement to arrive and thought to make a replacement out of brass. Phosphor-bronze might have been better, but I didn’t have any. The main problem is in drilling the tiny hole required, 0.2mm diameter for the hole stones of the Soviet MX6 chronometer’s balance and escape wheel staffs. It is now possible to buy tungsten carbide drills of this size, but they were intended for drilling fibreglass printed circuit boards using specialised machinery. In the amateur or repairer’s workshop, where the tailstock of the lathe or the drill chuck may not be perfectly co-axial with the lathe axis, drilling a tiny hole off centre results in the drill wobbling and then breaking. In what follows, I have tried to show a method that works for me in producing emergency replacement hole stones, but first, a sketch of an MX6 holes stone. I have not dimensioned it fully, as other makes of chronometers may well need different thicknesses and diameters.
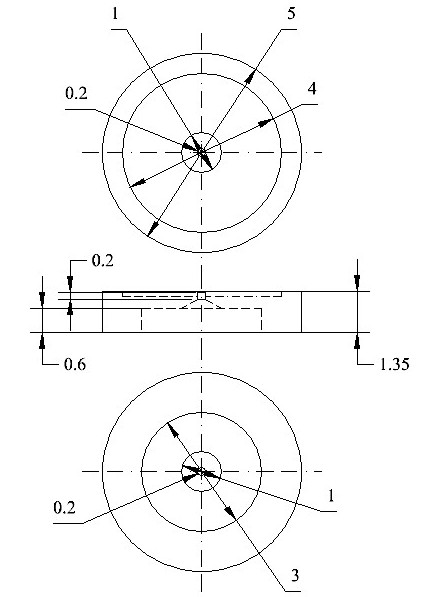
Figure 1: Sketch of MX6 chronometer hole stone.
The upper face of the stone has an annulus excavated for a depth of about 0.3 mm around a central island and the face of the island is relieved by a “whisker”, perhaps 0.05 mm, so that when the end stone is in place, there is a slight gap between them to allow oil to run by capillary action and form a reservoir. The lower face is also relieved by drilling in stages so as to leave a hole 0.20 mm in diameter and of about the same length. The point of a larger drill leaves a conical lead-in to the hole, to help the end of the pivot to find its way and then an end mill gives a flat-bottomed hole surrounding. it.
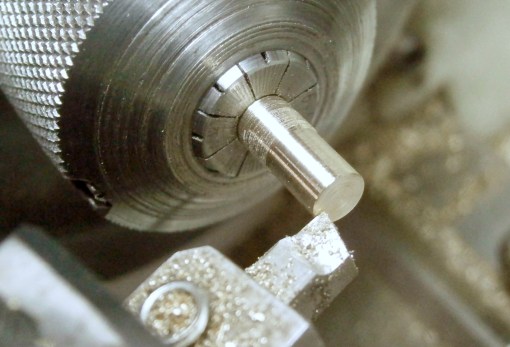
Figure 2: Facing end of the blank.
A scrap piece of brass is first turned down to a close fit in the hole in the plate, in this case 5.00 mm diameter and then carefully faced (Figure 2)

Figure 3: Excavating annulus.
Then the annulus is turned away with a round-nosed tool (Figure 3). Note that the tool has negative rake, which gives a very fine finish on brass. It doesn’t matter how deep the excavation is, as long as it is much more than a whisker deep! Then the face of the island is relieved by 0.05 mm, as noted above and the blank parted off a little over-thick (Figure 4).

Figure 4: Parting off.
One must now digress to make a shallow socket in the end of a scrap of brass bar (Figure 5).
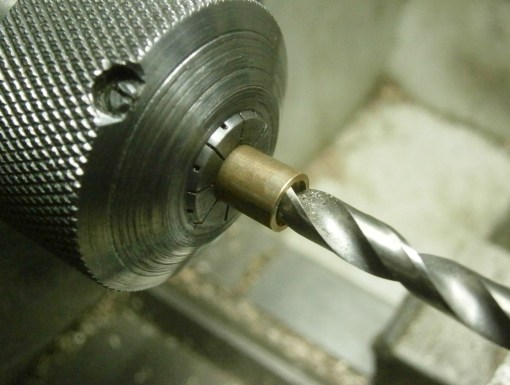
Figure 5: Drilling a socket
The diameter of the scrap doesn’t matter as long as it is larger than that of the blank, but the size and the depth of the hole does matter. Unless a drill is perfectly sharpened it is likely to drill over-size, so I suggest making a start with a centre drill, followed in this case by a 4.7 mm drill. Then even a 5 mm drill that has slightly un-equal cutting lips will follow the hole so-formed and be of the correct size. The finish of the walls may not be great, but the size will be right. I made mine a mere 1 mm deep. Before proceeding further, measure the thickness of the blank so as to know how much to take off the thickness. As the faces of parted-off material may slightly concave or convex, measure near the edge, as in Figure 6.
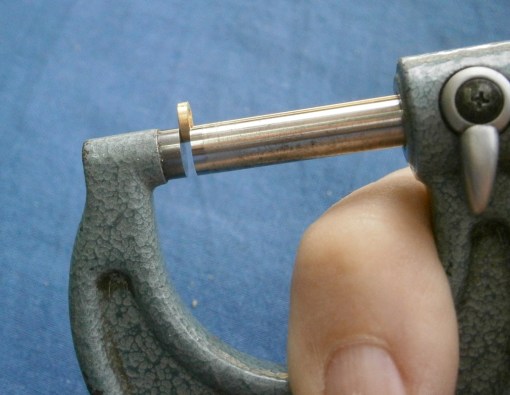
Figure 6: Measuring thickness of the blank.
Then the socket is heated gently and annointed with flake shellac to leave an even coating inside. While the shellac is still liquid, the blank is firmly seated in the socket and the whole allowed to cool, when the socket and blank can be replaced in the lathe.

Figure 7: Facing underside of blank.
After careful facing and removing metal to the correct thickness (Figure 7), drilling can begin. Here, careful depth control is essential, using the graduated thimble on the tail stock quill rather than a ruler. A dial gauge could also be pressed into service. Carbide drills are usually sharpened by the four facet method so that they are self-centring, but to make sure, make a dimple with the much more rigid centre drill and then feed in the 1 mm drill carefully to a pre-calculated depth (Figure 8).

Figure 8: Drilling with 1 mm carbide drill.
In the example shown, this leaves only 0.2 mm for the very slender 0.20 mm drill to tackle and there should be no problem of it wandering off centre , since the larger drill leaves a conical lead in.(Figure 9).

Figure 9: Drilling with 0,20 mm carbide drill.
Although tungsten carbide is a very strong and dense material it is also brittle, so the lathe has to run at high speed and the feed has to be slow to avoid breakages. Once the hole has been drilled successfully, it remains only to use a 3 or 4 mm end mill to form the relieving step. The depth of this must also be calculated, as it is important to leave the conical run-in area to guide the pivot into the 0.20 mm hole. The new stone is now separated from the socket by heating and given a soak in alcohol to remove all traces of shellac, after which the thickness can be checked. It is a good idea to brush the floor around the bench when separating the stone, to make it easier to find it when you drop it on the floor.
Figure 10 is a composite photograph to show both sides.

Figure 10: The finished stone.
I don’t know how long this improvised lower hole stone for a chronometer escape wheel pivot will last, but at the moment, the instrument is running well and heading for a good rate. I have a French drum clock that was one of my grandmother’s wedding present in which the relatively fine pivots run directly in the plates and there is no sign of wear at the low power end of the train after over a hundred years of continuous running, so I hope that my stones will also last over a hundred years. If they do not, they are easy to replace.

Leave a comment