A little while ago, a friend in South Korea sent me two balances from Soviet MX6 chronometers, to see if I could get them to run to time. One he had found impossible to get slow enough with the available range of adjustment of the timing weights and the other he could not get fast enough.
I first checked the physical dimensions of the balance wheel and its associated rollers and springs and all were very closely similar. The timing weights were all 4 mm in diameter give or take 0.01 mm and all of the same length. All were 0.40 grams within the limits of precision of my electronic balance, which reads to a precision of 0.01 g (for the record, the whole balance without the spring but with rollers weighs about 12 grams). That left only the elasticity of the springs and as I am not equipped to investigate that , I surmised that in assembling the chronometers, selective assembly may have been used, so that fast springs might have been matched with balances of greater inertia.
I was not about to meddle with the springs, which looked perfectly normal to me, so that left only the timing weights. The fast balance was relatively easy to deal with, by adding weight to the timing weights. My friend had used Blu tack with some success. Tempting as it was to take the quick way out and add a blob of solder to each side and then file it off until each weight was equal, I decided to make a proper job if it by fitting tiny sleeves to the weights. It was a simple matter to turn down a piece of brass bar to a diameter of 5 mm, drill and ream it to 4 mm and part off 3 mm lengths, then cutting diagonal splits so that it could be sprung in or out if required. As it happened, I was lucky, in that both sleeves weighed exactly the same. To fit closely on the existing timing wights, they had to be sprung in a little, and Figure 1 shows them in place (if you wish, the figures may be enlarged by clicking on them. Return to the text using the back arrow).

Figure 1: Close up view of sleeves.
It was then a simple matter to bring the balance to time by fitting it to one of my chronometers and following the procedure outlined in post 13 of this blog. At first, I timed it every ten minutes, making at first large adjustments and then homing in with ever smaller adjustments over longer intervals, until it was within one second in 12 hours, quite good enough for me and, I hope, for my friend.
The slow balance was more difficult, as it required smaller balance weights. The diameter of the studs on which the weights are screwed is a mere 1 mm, so any new weight I made would need an M 1 thread to be tapped through it and, as it was not possible to predict in advance how much smaller the weight needed to be, I was in for more work that I had realised. I decided to keep the length constant at 4 mm and vary the diameter. I chose 3 mm for a first attempt. Once a piece of bar had been tuned down to this diameter, it had to be drilled the tapping size for M 1 screws. Getting a 0.8 mm diameter drill to start on centre needs care as, if the drill point starts to wobble, it will not be long before the drill decides to cut off-centre and then break. My solution was to use my smallest centre drill to make a dimple in the end of the bar, just deep enough to start the 0.8 mm drill, and then to back out the drill every milllimetre to clear it of swarf that might cause it to jam and then break.
Once drilled, the piece could then be parted off at 4 mm and chucked to face the other end. Tapping one of these small pieces without breaking the tap requires great care (Figure 2 shows how fragile the tap looks; the ruler is 12.5 mm wide). Usually, brass is turned dry, but an attempt to tap it dry will sooner or later lead to a squeaking noise which, if prolonged will lead to the tap jamming and then breaking, so I have a little pot of extreme pressure oil on my bench to avoid just such a scenario, as taps of this size are very costly. Once a pair of weights have been turned, drilled, parted off, faced and tapped they can be weighed and, if significantly different in weight, a little turned off one face of the heavier weight until both are the same.

Figure 2: Metric no 1 tap.
The weights then need to be slit longitudinally over most of their length so that the threads can be sprung together to increase the resistance to turning on the studs. If left slack, they will unscrew themselves, eventually fouling the upper balance cock and bringing the chronometer to a halt. I don’t know how this might be done as a production process using a fine slitting saw. I did it with a piercing saw fitted with the finest blade available. The other end then needs to be slit at right angles to the first cut with a wider saw for a depth of about half a millimeter to form a screw driver slot. The ends of the long slot can be squeezed together with a pair of brass-faced pliers until there is definite resistance to turning the weight by the fingers.
This, my first attempt, weighed in at 0.21 g and was too small, as now the balance could not be got slow enough without the weights fouling the balance cock, so I tried again with a diameter of 3.2 mm, weight 0.24 g. Figure 3 shows one of my first pair alongside the final attempt Now it was so nearly fast enough with the weights screwed fully in that I succumbed to impatience and filed a little off both ends of both weights. My impatience was rewarded and the balance now kept time within 2 seconds a day with the weights screwed out about half a turn.
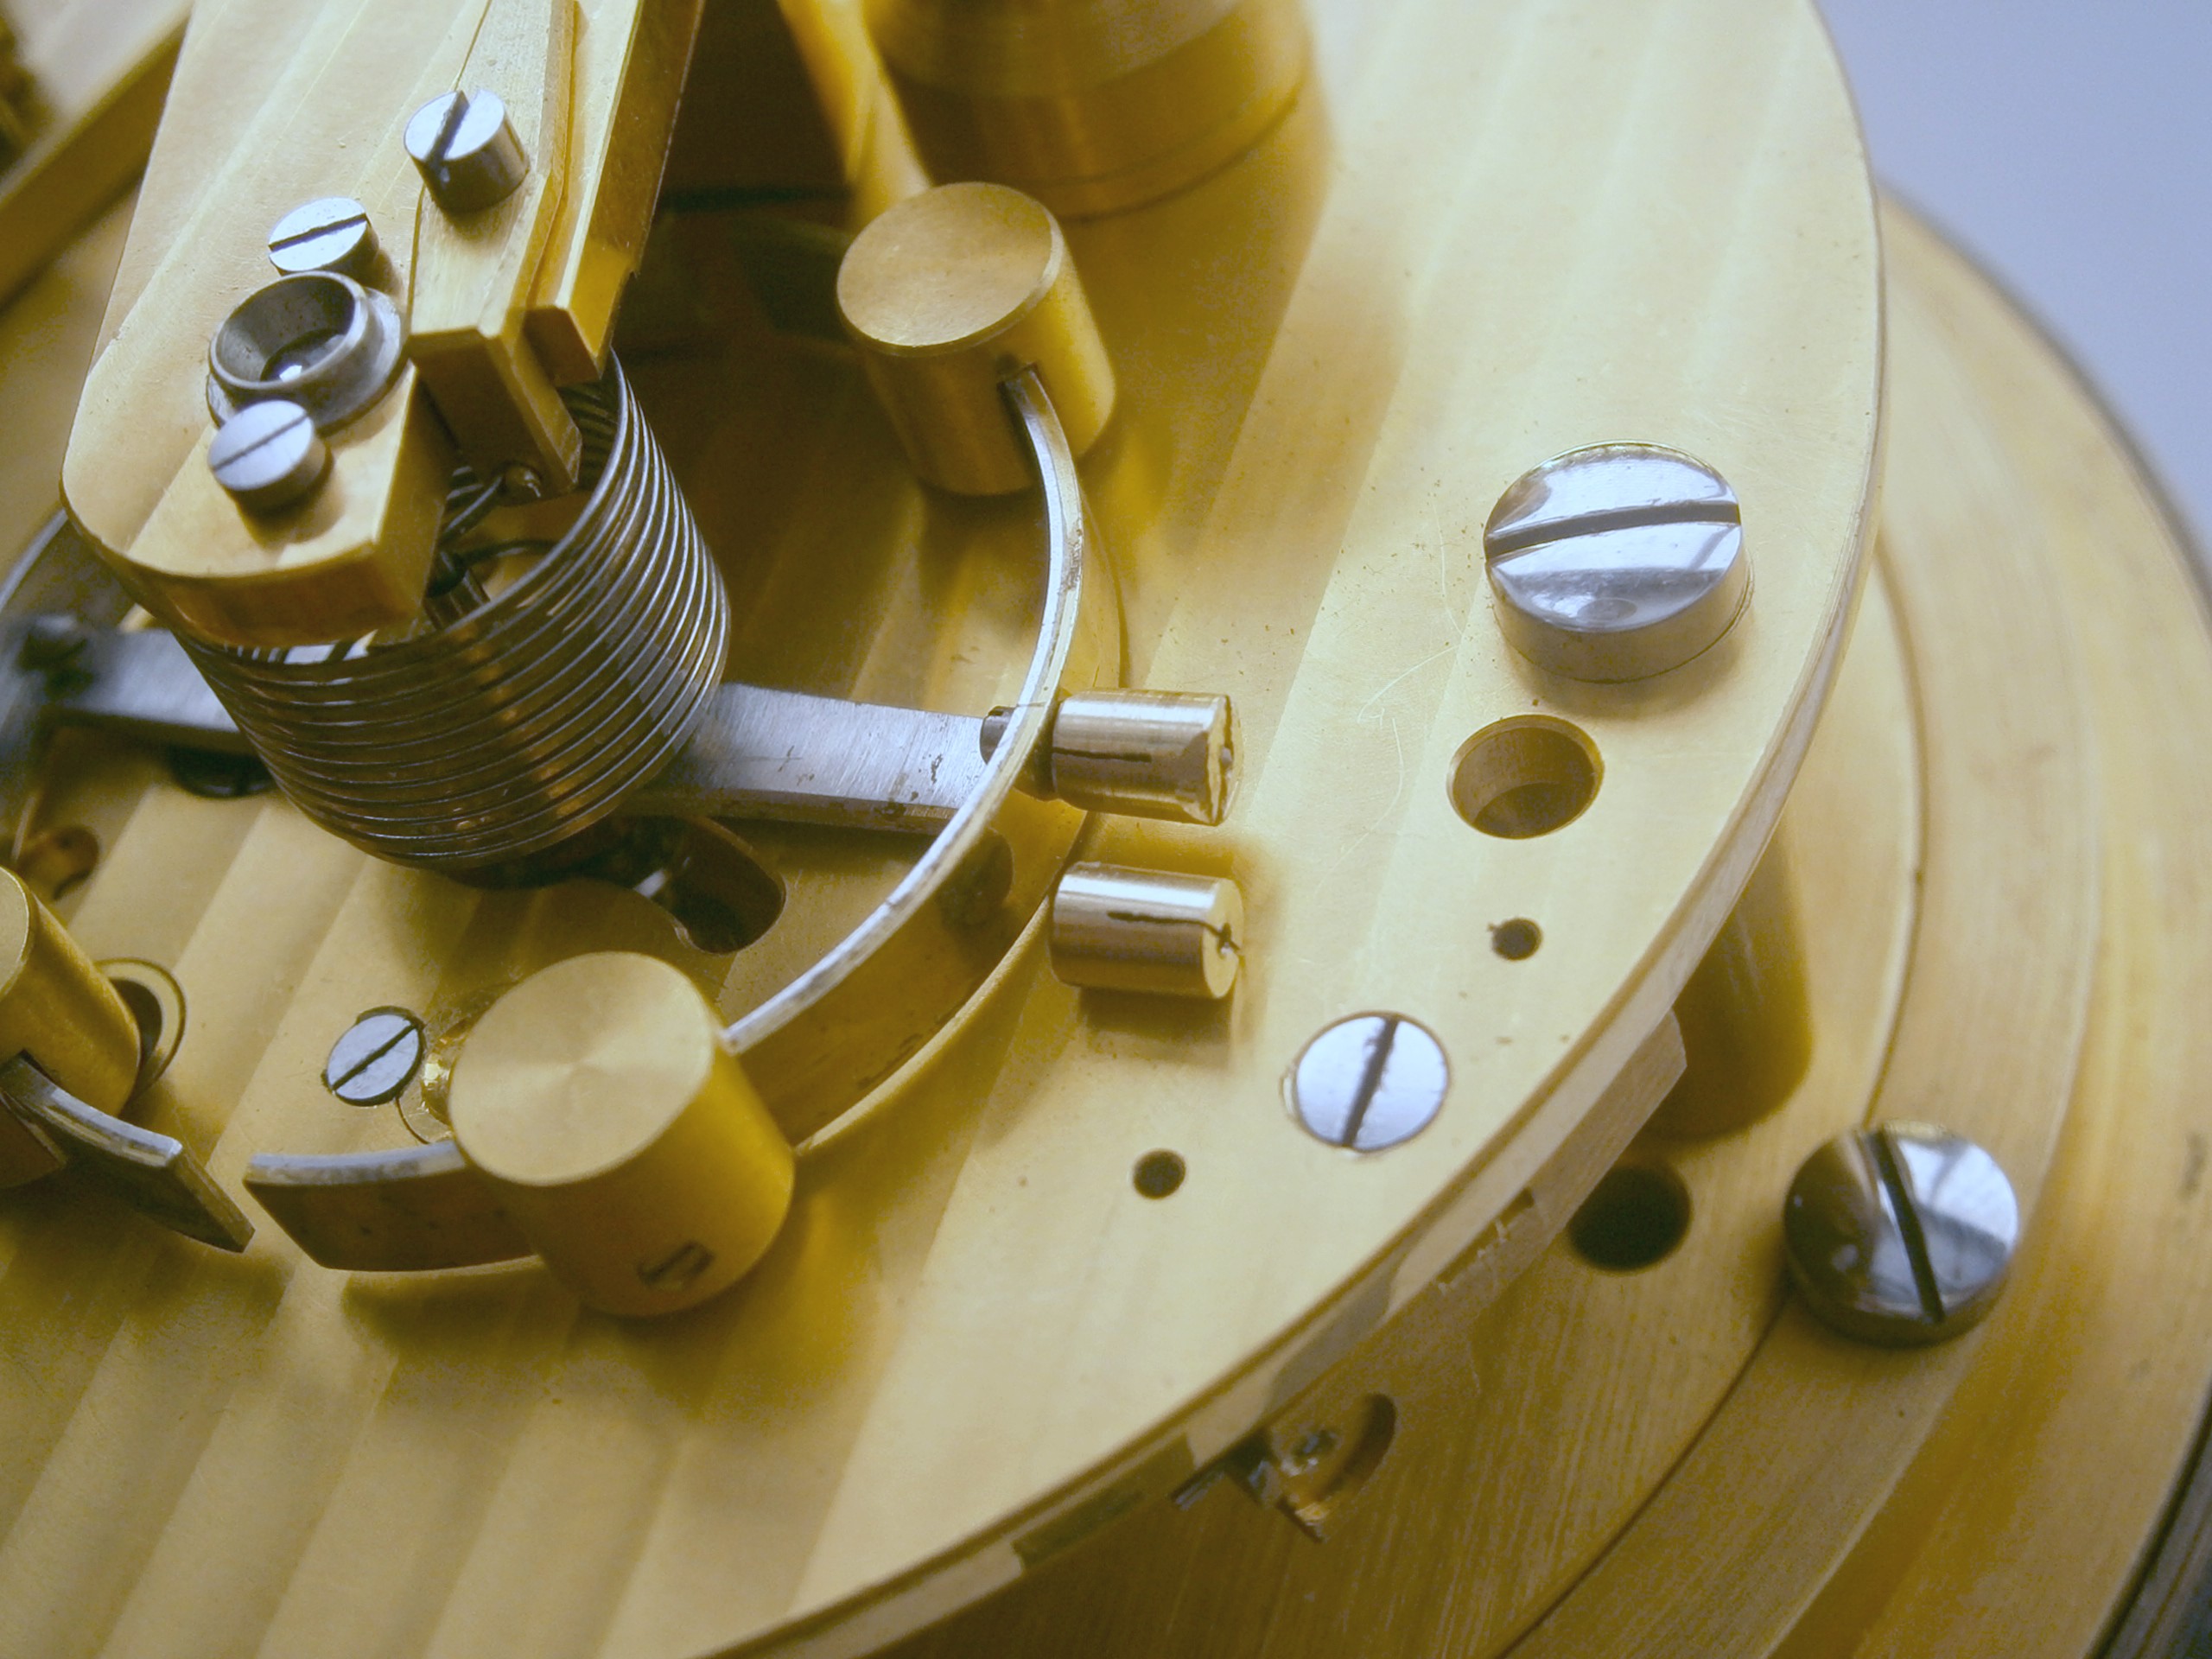
Figure 3: 3.2 mm weight (fitted) with 3 mm weight alongside.
A few words about stopping the balance and adjusting the weights with it in place may save some anguish. If you have a delicate touch, you can stop the balance by using your finger tip, but you may find out that your touch is not quite delicate enough when one or both balance staff pivots break off, so I advise using a small and soft camel hair artist’s brush which I feed in from the side, with it brushing against the timing weights until the balance eventually comes to a safe halt (Figure 4). Note that the brush is at about a right angle to the balance cock as this is where the balance will come to rest (see also Fig 3).
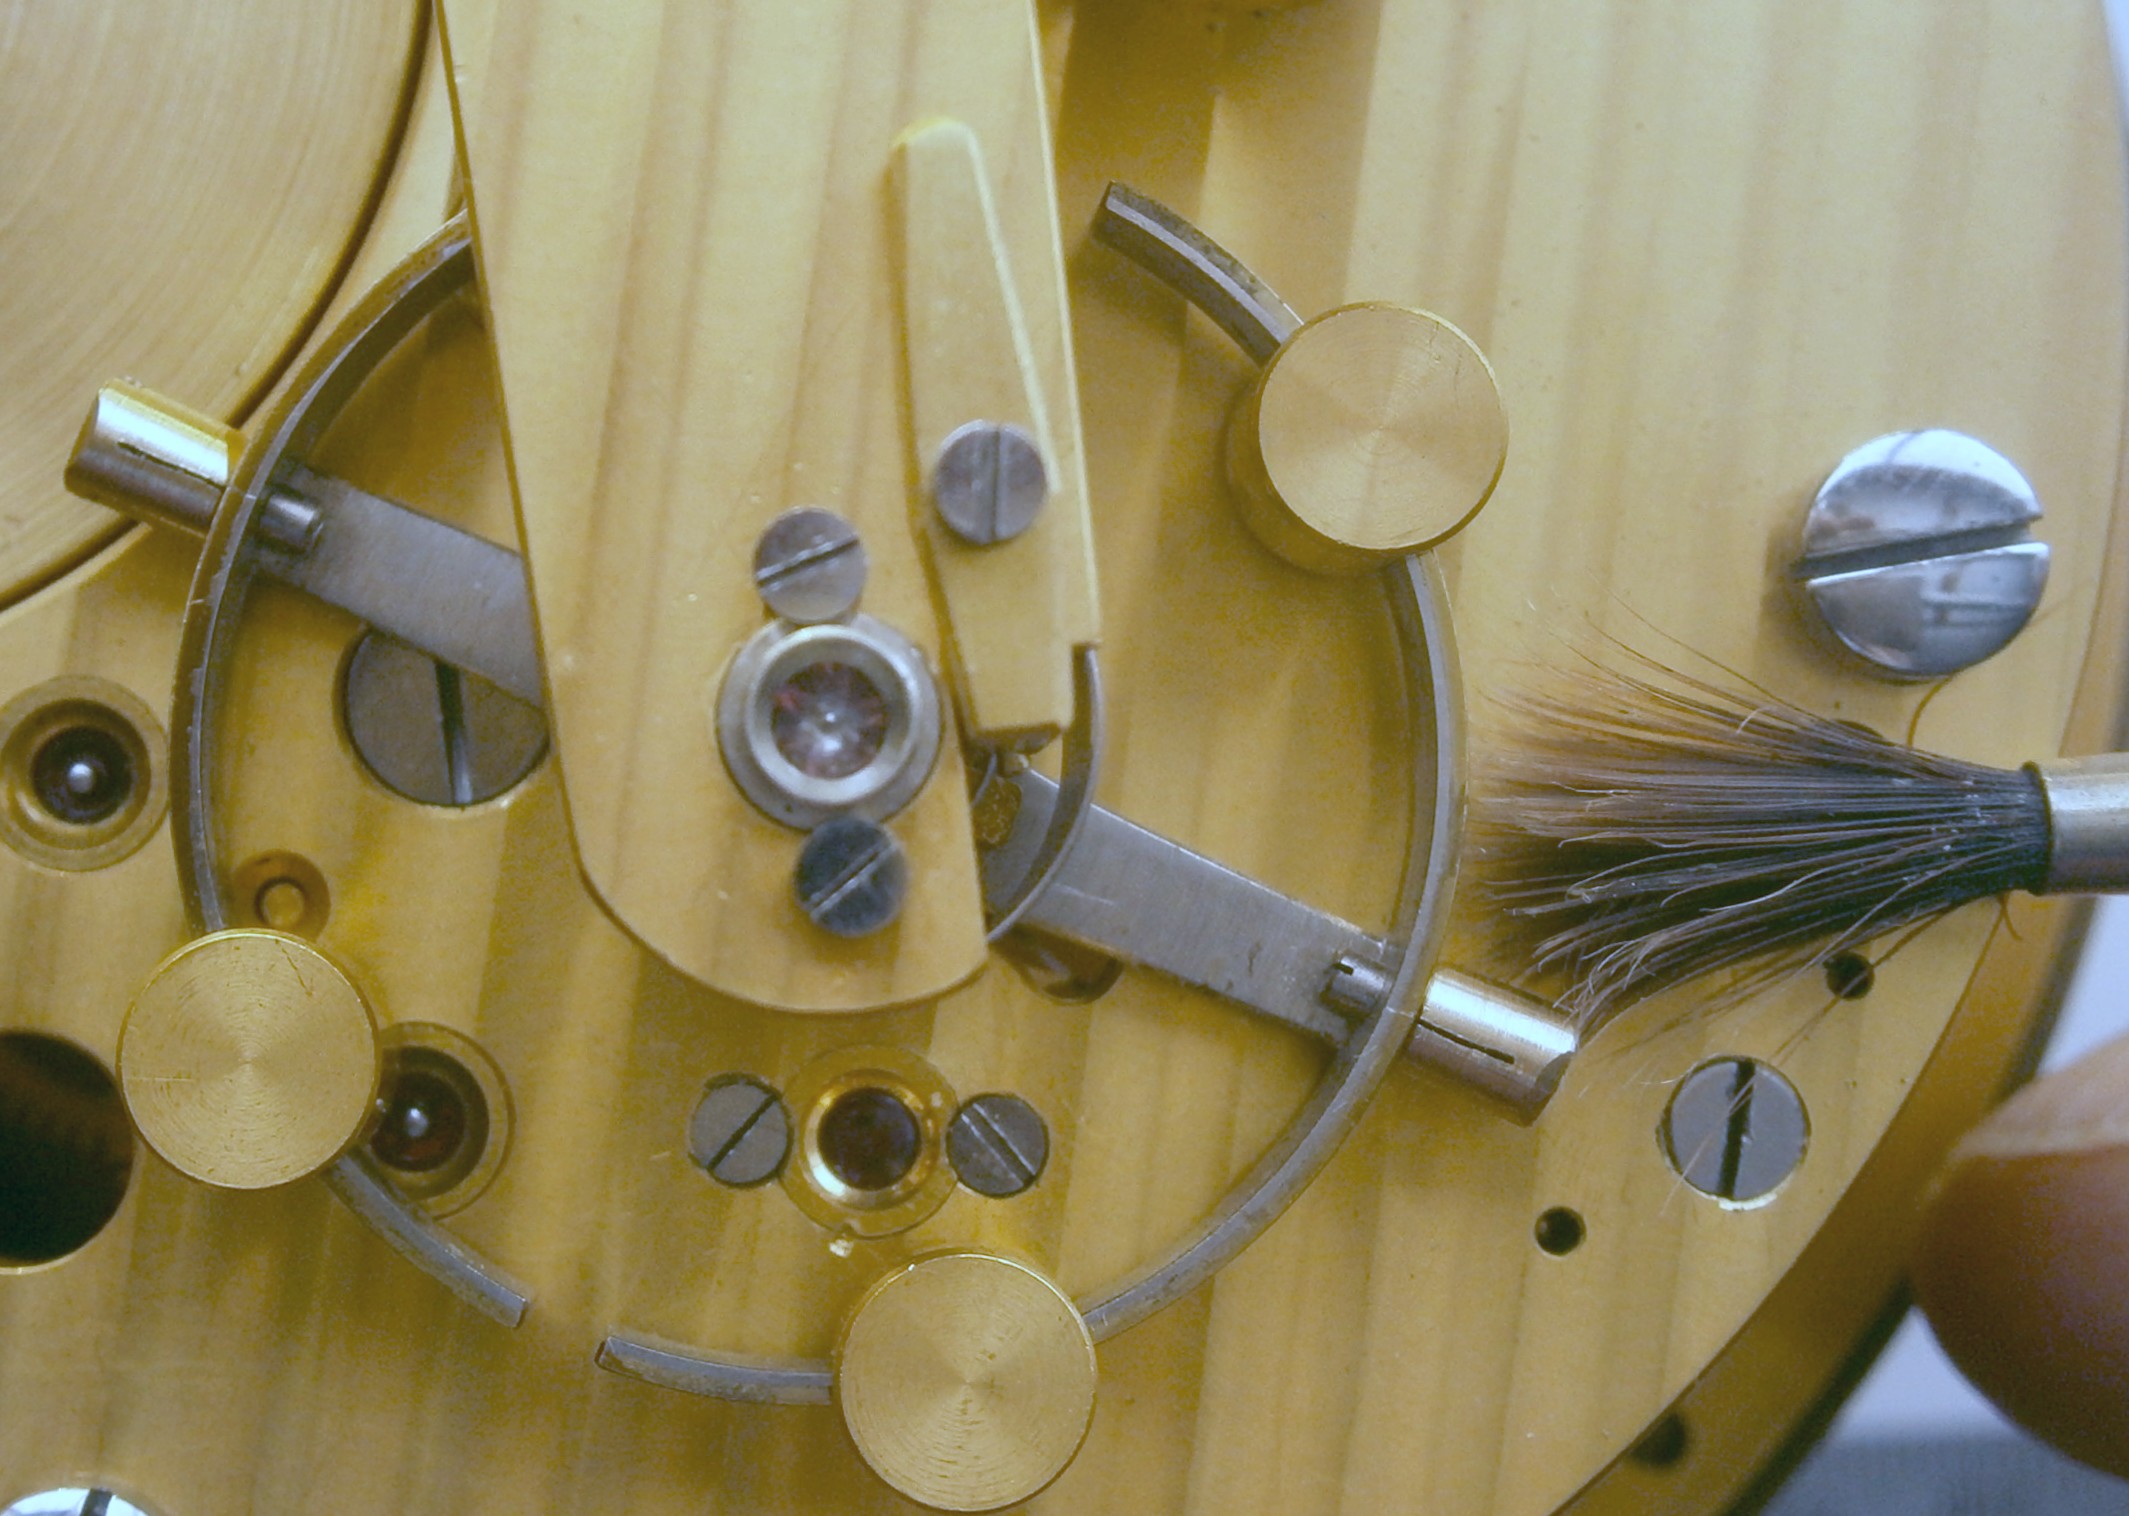
Figure 4: Stopping balance with a brush.
There is no substitute for a delicate touch when it comes to adjusting the weights. If you simply jam a screwdriver into the slots, sooner or later you will break something and it will be painful to your bank balance. Steady the balance with a brush applied to one weight while you deliberately approach the slot in the other with enough magnification to see clearly the slot that your screwdriver tip is aiming for. Provided that your screwdriver tip is in good condition, almost a sharp edge, it needs only to be resting in the slot. You are not driving the weight home. You are coaxing it round. There should be no up or downwards pressure exerted if you value your pivots.
If you ever have to transport a chronometer, it is important to immobilize the balance. Typically, this was done by using tiny wedges of cork underneath the arms of the balance, called “corking the balance, but a little safer to apply is to use six small slips of notepaper folded in two as shown in Figure 5. It is more difficult to break something with paper, and if the top pivot is already broken, the paper will still work to some extent.

Figure 5: Blocking balance wheel.

Beautiful work! It occurs to me to ask *how* fast was the fast-running one? If it was gaining about 4 min / day it might have been made as a sidereal (+3 min. 56.4 s/d). I know of no rationale for the _losing_ one, though!
A good thought, Alan, but the daily gaining rate was much more than could be explained by it being a sidereal chronometer, and it would have been mean to make a sidereal chronometer without giving any hint on the instrument or its case.
Recently ordered and received a replacement balance for a Poljot chronometer purchased with a bent balance pivot.
Noticed right away that all four balance weights, although of the same diameter, were 2+mm. shorter in length than the original balance on this movement. The rate adjusting weights were also noticeably shorter.
Perhaps the chronometer you received which was gaining rate had a balance replacement provided by the same Eastern European source as mine at some point.
In communicating with my source regarding with this irregularity I was informed that he had sold these for years and never came across a rate adjustment problem.
I found this hard to believe but never the less remain curious as to why Poljot changed the design at some point. Perhaps for a different model with a higher bph ?
Thank you, Robert. The Poljot is the same chronometer as the Kirova and, with very minor changes, the WW II German Einheits-chronometer. I think the probable explanation is that with batch production of small parts it was difficult to hold tolerances so that all parts were interchangeable. Selective assembly was probably used, so that, for example, a slightly over-height balance cock was married to a slightly over-length balance staff, or a slightly oversize balance wheel married to smaller weights.
Awesome! Its in fact awesome article, I have got much clear idea on the topic of
from this paragraph.